While reflecting on which unit I wanted to re-work, I went through each project (as I’m sure most other students did) and considered the pros & cons of each piece. What were the weak points and the strong points? What had I learned since creating each final unit piece, and how could I apply new ideas or insights? After much consideration I decided to revisit our very first unit from this course.
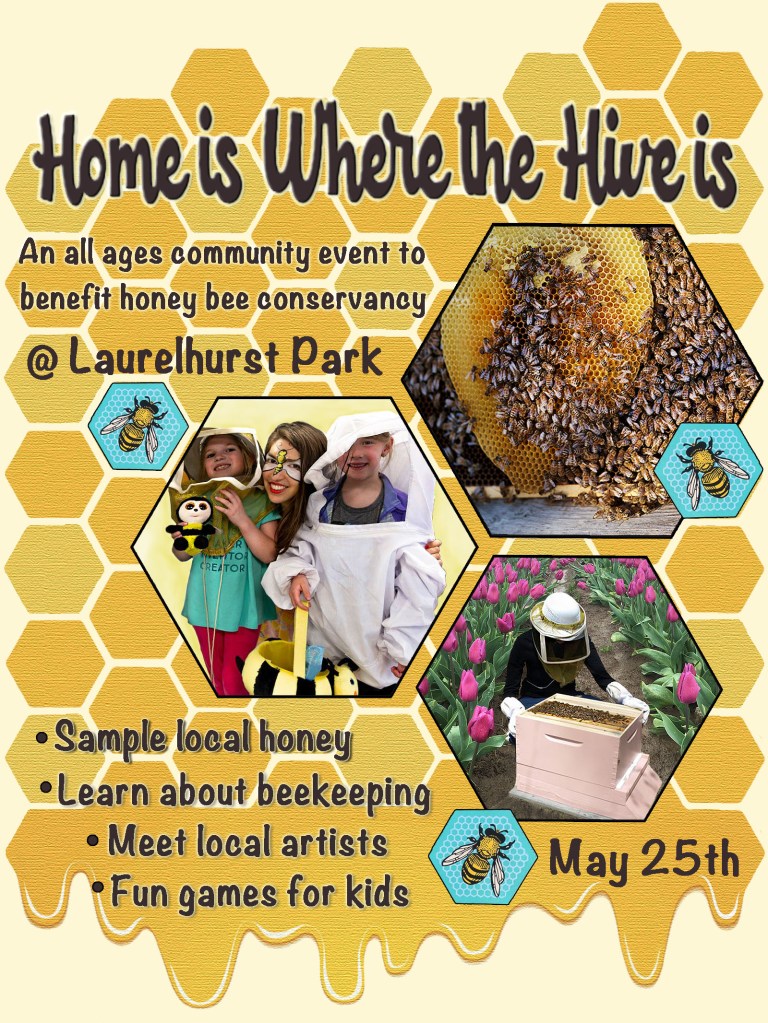
When I first created this project for our Photoshop unit, it had been inspired by a personal collaboration that I had done with “The HoneyBee Conservancy” in New York. As an artist, and someone who feels passionately about the non-profit sector, I wanted to design an artwork that could serve a greater purpose. (Side note: This is also the inspiration behind my blog’s name; “A Cause to Create.”) A few months prior to beginning grad school, I had designed and created an art print titled, “The Disappearing Honeybee”, to draw attention to the issue. The work was inspired by the devastating decline of the honeybee population in the U.S. The art print was a big hit, and I was able to donate over 50% of the proceeds from the sale of each print to They Honeybee Conservancy to help promote education and awareness surrounding the issue. It was at this moment that I knew I wanted to merge non-profit and art in all aspects of my life. Needless to say, that’s where the inspiration for my Photoshop project came from. I created a fictional event called, “Home is Where the Hive it” and designed a flyer to advertise all the aspects of it.
Original Unit 1 Final Project
There were a few reasons why I decided to revisit this project. The piece felt particularly vulnerable to me, and I wanted to dig a little deeper into understanding “why?” I began by pin-pointing and acknowledging the obvious “flaws.” From what I could see, the headline appeared to be slightly blurry or pixelated. The drop shadow on the text “Sample localhoney” was disproportionate to the other text. The date & location didn’t have any effects added to them and seemed “flat”, and the remaining text seemed like it could use a little more color.
Post-reflection Final Project
I started by re-working the headline. I refined the edges of the text selection and applied a smooth effect to get rid of the pixelated appearance. I also wanted the headline to “pop” a little more so used a slightly darker brown and adjusted the layer effects. For the outer-glow I increased the spread and pixel size, and well as free-transformed the text to be slightly taller and wider. For the date & location text, I applied a drop-shadow and outer-glow so they wouldn’t appear to be as flat. I also had to adjust the text size with the free-transform option so that I could make the text taller without making it also wider. To add a little variation of color to all the brown text, I used the eye-dropper tool to sample a darker turquoise color from the little girls’ shirt in the photo, and then applied that color to the text under the headline; “An all ages community event to benefit honeybee conservancy.” I thought this was a nice addition that helped the three little hexagon honeybee tiles to “pop.” For the turquoise text I had to also add an “inner-shadow” effect to make sure the lighter color was legible next to the brown text color.
Even though they’re small adjustments and subtle changes, I feel that they make a big difference when you look at the final product. I’ve learned so much from each unit this course. So many of the skills and concepts from the Adobe programs can be utilized in everyday life. I look forward to applying the knowledge I’ve gained in both my person and professional life.
At the start of unit four, it was clear that the process of filming and producing a video story would bring about some very unique challenges. I knew that any preparations or ideas I was considering would have to be completed within the guidelines of “social-distancing”. These limitations made for a challenging, but uniquely fun assignment. With the objective of my course theme being centered around “art” and “non-profit”, it was an easy decision to focus my video around art. However, there were a few limitations in regards to selecting a story-format. Taking into consideration the social restrictions, I decided on a promotional/inspirational genre style. I wanted to produce something uplifting and optimistic with a core focus around art, but also something that could be watched and enjoyed by anyone.
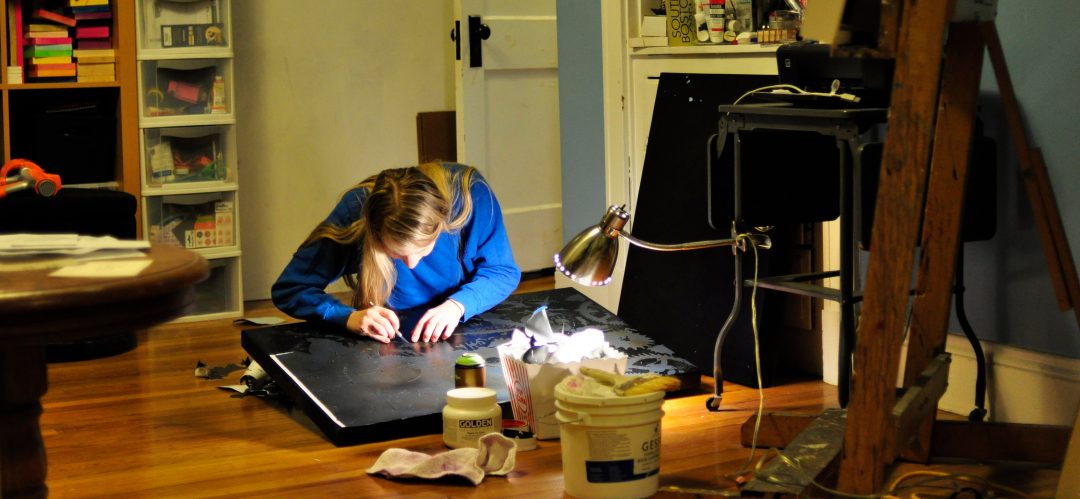
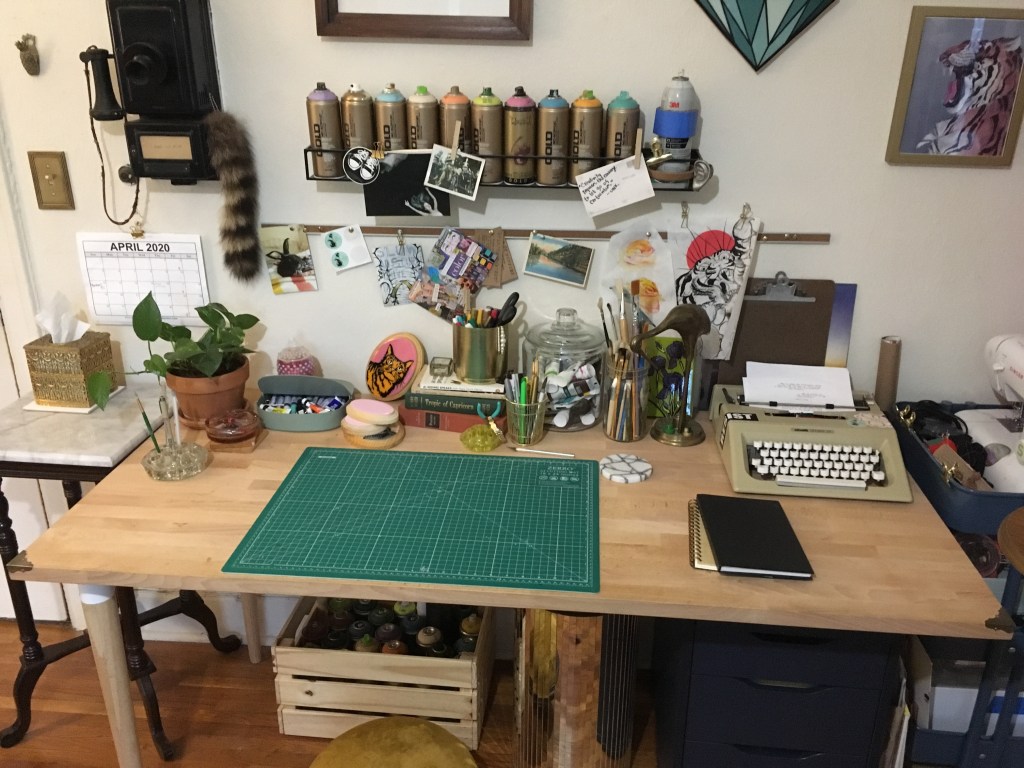
The basic storyline would open on the studio-art desk in my apartment. The scene would consist of shots of the main character, from the neck down, sitting at the desk and painting. I made the decision to portray the main character as an anonymous figure so that the viewer could potentially imagine themselves in the story. The narration would start after a few seconds of the establishing shot and begin describing how “art” is a part of everything in our lives. The narration would continue throughout the entire video as a sort-of philosophical and poetic monologue. The video would then progress into a series of clips that represented the ways in which art is all around us. These would be sequenced in between shots of the main character sitting at the desk creating and making art. The scenes in the video would change every few seconds in a montage-style that loosely correlates with the narration. At the end, the video would finish back at the original desk, coming full circle, and then fade to credits.
Considering that I wouldn’t be shooting all of the video footage at one time, I made sure to take a “scene reference photo” so that I could accurately remake the set, and ensure continuity for the next time I filmed. I made the decision to utilize old video clips along with a “point-of-view” format for a few reasons. I would be able to avoid copyright issues by using my own footage that I had personally shot (or that had been shot by a friend). I would be able to incorporate a wider range of video than what was available in my apartment, and I would be able to safely utilize multiple “sets” and “characters” without breaking any health-guidelines.
Once I had established a storyboard, I began the task of writing and recording an audio-narrative. I pulled inspiration from quotes written by my favorite artists, a few famous poems and some of my own writings. To record the narration, I copied the same technique that I used during the creation of my audio story for unit three. I went into my bedroom closet, closed the door to block out any external noise, and used the Voice Memo App on my laptop. Next, I collected the existing video footage I wanted to use, and and made sure to reach out to the necessary friends in order to get official copyright permission for any clips that had not been filmed by me.
My next step was to create the “establishing shot” and main film set for the video. In order to utilize a stable surface to shoot from and reduce any movement in the video, I had to Google and create a “diy” phone-stand. Luckily, the only materials I needed to make one were; some tape, a small plate and a cardboard toilet-paper roll. (I’ve attached a photo for anyone who wants a good laugh)
Once I had my phone-stand, I shot the footage of my establishing shot, and also collected footage of the scenes I wanted from a few various angles. I made sure to use the tips and suggestions from the Week-11 Readings; “Basic Shooting Principles“. After collecting all the raw video footage, I organized it into the project’s folder and imported it into Premier Pro. Using the techniques we learned from the tutorials, I was able to select specific clips to arrange, and customized them with the tools in “Effect-Controls”. For the establishing-shot I added a key frame to adjust the position & scale so the clip would slowly zoom inwards. For the last clip I added a “fade-to-black” so the ending would smoothly blend into the credits. I also chose certain video segments to add a “dissolve-film” effect so the transition would appear smoother.
The feedback and suggestions I received from my group members were a big help in editing and establishing the final story. Their ideas and different perspectives provided a great addition to my video. Following the feedback assignment, I made several adjustments and changes. I began by re-recording the audio narration in order to slow it down slightly. After reviewing the draft video several times I concluded that I may have rushed through reading the script. Next, I took the suggestion of one of my group members and added background ambient music. By using the WaveBeats profile on Sound-Cloud, I was able to find the perfect copyright-free track to layer into the background of my video. I used the audio-editing tools in Premier Pro to adjust the decibel and make sure the volume wouldn’t over power the story narration. The final adjustments I made were to add a few additional video-transition effects as well as an introduction title at the beginning of the video.
Making this video and adapting to the creative limitations of the pandemic was a delightful challenge, and a great way to end the semester. I’m very happy with my final video story, and I look forward to the chance to use Premier Pro again in the future.
The process of filming and producing my draft video brought about some very unique challenges, (as I’m sure it did for everyone else). I knew that any preparations or ideas I was considering would have to be completed within the guidelines of “social-distancing”. These limitations made for a challenging, but uniquely fun assignment. With the objective of my course theme being centered around “art” and “non-profit”, it was an easy decision to focus my video around art. There were a few limitations in regards to selecting a story-format. Taking into consideration the social restrictions, I decided on a promotional/ inspirational format style. I wanted to produce something uplifting and optimistic that was focused around art, but that could be watched and enjoyed by anyone. The basic storyline would open on the studio-art desk in my apartment, there would be shots of the “main character”, from the neck down, sitting at the desk and painting. The narration would start after a few seconds of the establishing shot and begin describing how “art” is a part of everything in our lives. The narration would continue throughout the entire video as a sort-of philosophical and poetic monologue. The video would then progress into a series of clips that represented memories and/or flashbacks. These would be sequenced in between shots of the main character sitting at the desk and making art. The video would change every few seconds in a montage-style that loosely correlates with the narration. At the end, the video would finish back at the original desk and then fade to credits. I decided on this format for several reasons. I would avoid any copyright issues by using my own footage that I had personally shot, or that had been shot by a friend. I would be able to incorporate a wider range of video than what was available in my apartment. And I would be able to safely utilize multiple “sets” and “characters” without breaking any health-guidelines.
Once I had established a storyboard, and composed an audio-narrative, I collected the existing video footage I wanted to use. Next, I reached out to a few friends to get official copy-write permission for any clips that had not been filmed by me. My next step was to create the “establishing shot” and main film set for the video. I made sure to use a phone-stand or stable surface to shoot from to reduce any movement in the video. I then shot the same scenes from various angles and used tips from the Week-11 Readings; “Basic Shooting Principles“. Once I had collected all my raw video footage, I organized it into the project’s folder and imported it into Premier Pro. Using the techniques we learned in the tutorials, I was able to select specific clips to arrange, and customize them with the tools in “Effect-Controls”. For the establishing-shot I added a key frame to adjust the position & scale so the clip would slowly zoom inwards. For the last clip I added a “fade-to-black” so the ending would smoothly blend into the credits. I also chose certain video segments to add a “dissolve-film” effect so the transition would appear smoother. For the Final Video Story I have a few additional ideas and effects that I would like to incorporate. However, I’m looking forward to the feedback and suggestions from my group members during the review.
I’ve always been a huge fan of audio creations. There’s such a subtle, but obvious, art to them. So in order to prepare for the audio story assignment, I began by reflecting back on some of my favorite podcasts for inspiration; Radio Lab, The Joe Rogan Experience, This American Life and The Ricky Gervais Show. While listening, I tried to pin-point the characteristics and traits that I had enjoyed the most, and assessed which aspects I could potentially utilize in my own audio project.
Since the objective of my course topic is to connect artand non-profit, I wanted to make sure that the direction I took, and interviewee I selected, would closely align with those interests or at least be in a similar field. A good friend of mine, Kyle Rinta, had recently told me about a podcast that he was in the process of creating. The idea for the podcast had come from the current political climate in our country, and the growing divide between political parties. Kyle wanted to create a platform where people could respectfully discuss, face to face, their views and opinions. A safe environment to hear each other out, and possibly bridge the divide we seem to be facing in society. Aside from it being a wonderfully optimistic idea for a podcast, it also perfectly joined together the fields of art and non-profit, in a creative way, to help people. It would be an audio story about the creation of an audio platform.
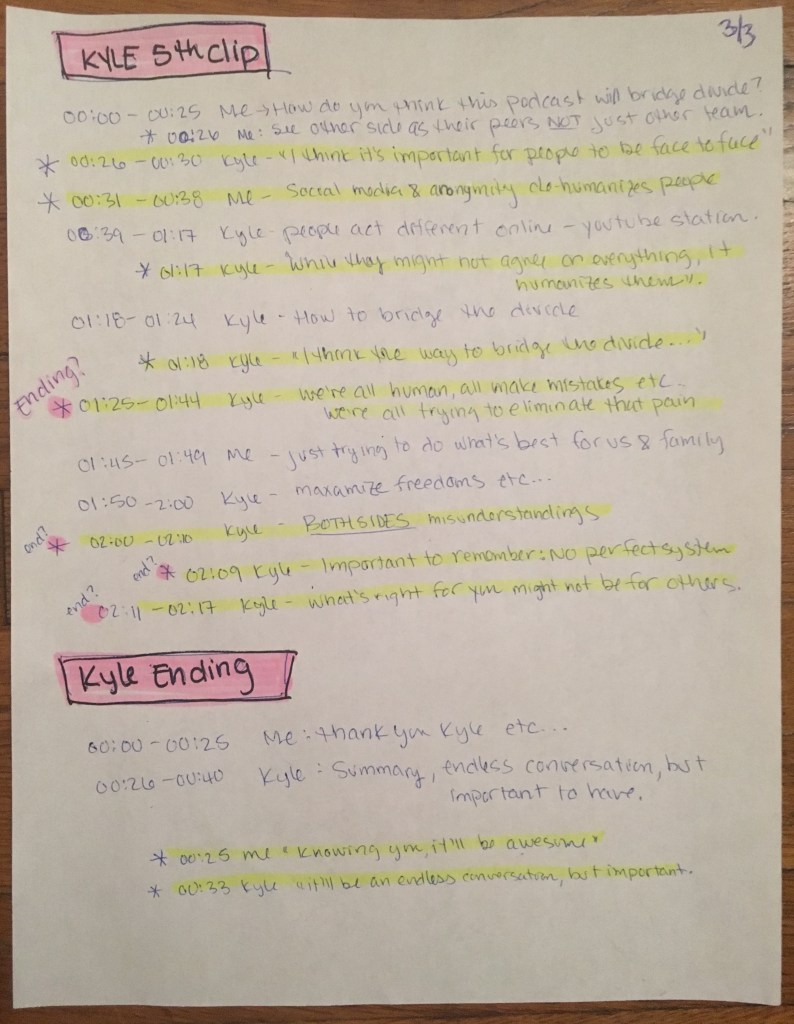
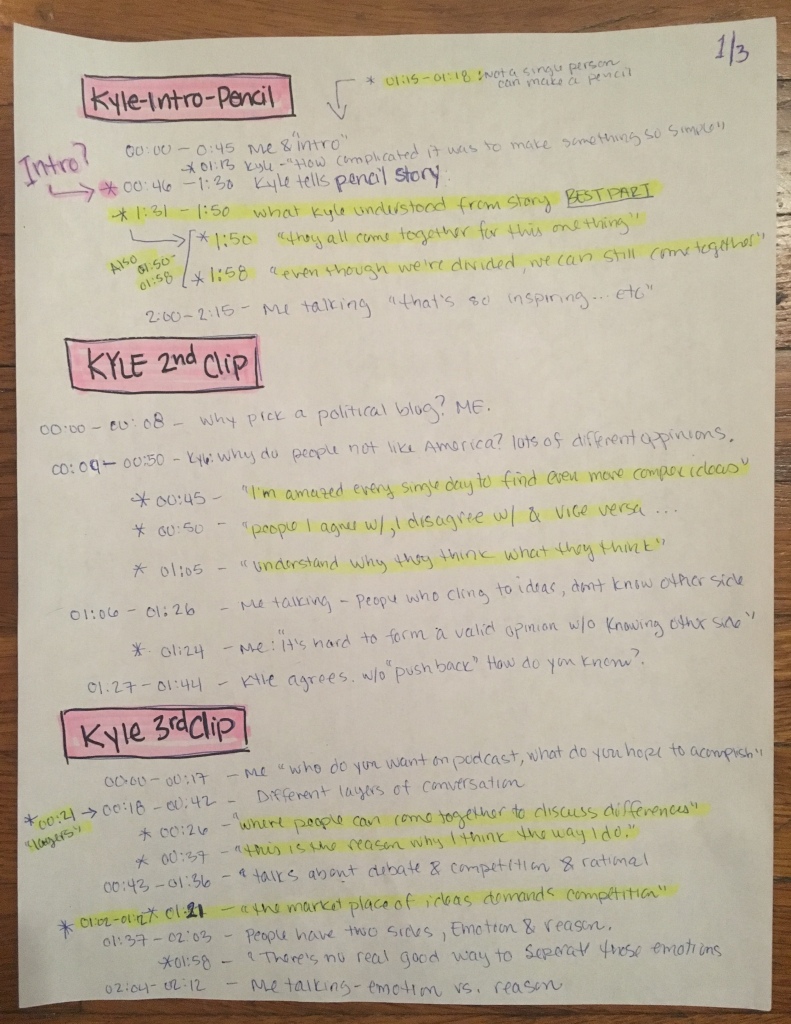
Prior to our informal interview I wrote up a brief, but thoughtful, list of questions and topics that I wanted to cover in the audio recording. I didn’t want the interview to sound scripted or stiff, but I also wanted to make sure that I didn’t accidentally leave out any key aspects. To record the interview, I used the “Voice Memos” program on my laptop, and placed the computer in between the two of us to get an even audio recording. I utilized the editing tip in last weeks readings and organized the content I recorded by “loggingtape.” I created six individual audio clips ranging from 00:40 seconds to 03:06 minutes. For the first and last clip I recorded an interview introduction and story conclusion. The four middle audio segments referenced the general questions and ideas that I had previous established, as well as the short story, “I,Pencil“, written by Leonard E. Reed, that had inspired Kyle to create his podcast.
Once I had completed the interview and logged the tapes in chronological order, I sat down to listen through the recordings and transcribe them on to paper. Adding this step allowed me to visually organize and archive the audio content. For each tape I wrote down a brief summary of the conversation with approximate time-stamps referencing the key highlights and best parts to potentially include in my story.
After establishing a visual reference for the interview with Kyle, I began the editing process. To edit the audio clips, I launched Adobe Audition and imported each of the six clips to work on, individually, as new Multi-Track Sessions. By utilizing the razor tool, I was able to select and delete specific time frames of each clip that contained unideal audio, such as long pauses, redundancies, or awkward “ummms” in the conversation. In order to make sure the edited clips merged together seamlessly, I used the fade-in/ fade-out tool, as well as overlapping the adjacent ends of certain segments for audio continuity. Once all six files were edited and finished, I exported each session as a Multi-track Mixdown, saved them as MP3s and then imported all of them into a new Multi-Track Session. Next, I cut, moved and placed the clips into the appropriate order, and listened to the final audio compilation to ensure everything was accurately placed.
After having a few days to evaluate and think-over aspects of my draft story, I was eager to listen to the audio stories of other group members and read their feedback and suggestions. Two specific areas of improvement that were mentioned were the background noise and audio length. There was a subtle, but noticeable “humm” sound throughout the background of the interview audio. To remove the sound, I referenced the “Advanced Audio Techniques” link in the Week-10 readings, and followed the steps laid out for “Noise Reduction” in the Adobe video. Using this effect, I was able to select an audio sample of the “humm” noise, capture the noise print, and drastically reduce the decibel volume. In addition to the background noise and audio length, one group member suggested I incorporate a more informative introduction to my audio story. I decided to give it a shot, and set about writing a brief script for an attention-grabbing, but informative intro. Given the current quarantine situation in Washington, I knew that I wouldn’t be able to go back downtown to the original interview location, so I set up a very rudimentary recording room in my bedroom closet. It’s a more centrally located (small) room, so there would be no street traffic sounds coming in from the windows. It’s too small to allow for any sort of echo effect, and the abundance of clothes hanging on racks and shelves would work as a soft surface to absorb the sound waves and prevent any interference.
After successfully recording the intro, I was inspired to add a few additional layers and effects to my story. First, I downloaded an ambient-background sound from a copyright free music station on YouTube called “AShamaluevMusic.” I used this subtle background music to layer behind my introduction. Next, I wanted to add a couple details to the story using Foley Sounds. I referenced the CreativeCommons Audio readings and created an account with the FreeSound site. With a simple search I was able to find a sound bite of a door being opened, and a three minute audio clip of busy restaurant sounds to play throughout the duration of my story.
The next step I had to complete was by far the most tedious. Once all the sound bites and audio files were imported into Audition and arranged over five different levels, I had the daunting task of trimming slices and seconds off each layer until my story was edited down to three minutes. I razored out every awkward “umm” or unnecessary pause, until I reached that goal. By the time I was finished, I had edited down the interview audio to 19 separate sections, and it sounded great. The final touch I made to my audio story was to listen through while adding “key frames” to adjust the volume levels in specific sections. For the restaurant-ambience, I used the key frames to fade in as the door opened and fade out as the interview began. For the interview audio, I used the key frames to emphasize certain words, or tone down louder areas. The subtle changes and details I was able to create with this technique gave the story a more polished and professional feel.
I was delightfully surprised with how much fun I had with this project. The audio stories from my group members were inspiring, and their feedback was thoughtful and essential in making my own story. I found the program to be fairly easy to use, and the level of professional quality audio content you’re able to produce is thrilling. I’m looking forward to using Adobe Audition again.
I began the audio assignment for unit three by reflecting back on some of my favorite podcasts for inspiration; Radio Lab, The Joe Rogan Experience, This American Life and The Ricky Gervais Show. I tried to pin-point the characteristics and traits that I had enjoyed the most while listening to them, and assessed which aspects I could potentially utilize in my own audio project. Since the objective of my course topic is to connect art and non-profit, I wanted to make sure that the interviewee I selected would have similar interests or at least be in a related field. But most importantly, someone who would want to be interviewed. A good friend of mine, Kyle Rinta, had recently told me about a podcast that they were in the process of creating. The idea for the podcast had come from the current political climate in our county, and the growing divide between political parties. Kyle wanted to create a platform where people could respectfully discuss, face to face, their views and opinions. A safe environment to hear each other out, and possibly bridge the divide we seem to be facing in society. Aside from it being a wonderfully optimistic idea for a podcast, it perfectly joined together the fields of art and non-profit in a way that could help people. Prior to our informal interview, I wrote up a brief, but thoughtful list of questions and ideas that I wanted to cover in the audio recording. I didn’t want the interview to be scripted or stiff, but I didn’t want to accidentally leave out any key aspects. To record the interview, I used the “Voice Memos” program on my laptop, and placed the computer in between the two of us to get an even audio recording. I used the audio editing tip in this weeks readings and organized my content by “logging tape”. I created six individual audio clips ranging from 00:40 seconds to 03:06 minutes. For the first and last clip I recorded an interview introduction and story conclusion. The four middle audio segments referenced the general questions and ideas that I had previously established as well as the short story, “I, Pencil“, written by Leonard E. Reed that had inspired Kyle to create the podcast. Once I had completed the interview and logged the tapes in chronological order, I sat down to listen through the recordings and transcribe them on to paper to visually organize their content. For each tape I wrote down a brief summary of the conversation with time-stamps referencing the key highlights, and best parts to potentially include in the draft story.
After establishing a visual reference for the interview with Kyle, I began the editing process. To edit the audio clips, I launched Adobe Audition and imported each of the six clips to work on individually as new Multi-Track Sessions. By utilizing the razor tool, I was able to select and delete specific time frames of each clip that contained un-wanted audio, such as, long pauses, redundancies, or awkward “ummms” in the conversation. In order to make sure the edited clips merged together seamlessly, I used the fade-in/ fade-out tool, as well as overlapping the ends of certain segments. Once all six files were finished, I exported each session as a Multi-track Mixdown, saved them as MP3s, and then imported all of them into a new multi-track session. Next, I cut, moved and placed the clips into the correct order, and listened to the final audio compilation to ensure everything was accurately placed.
Going into Unit Two, I knew that our primary focus would be Adobe Illustrator. Personally, I had mixed emotions about this program. I was fortunate enough to learn how to use the Illustrator in my undergrad studies, however, it has been over ten years since then, and it genuinely felt like I was learning the entire program from scratch, all over again. Additionally, the version of Illustrator that I own is rather dated, and I found myself having to create unique and obscure means of accomplishing certain effects that the current version of Illustrator easily utilizes with a preset tool. BUT, I refuse to whine or use that reason as some sort of excuse for defeat, so I proudly accepted the challenge and jumped into the assignment head first. I began the draft logo assignment by thinking about what, exactly, I wanted my logo to represent. I decided on creating a logo to showcase my overall topic for the semester; “A Cause to Create.” It’s an idea that I feel extremely passionate about and I hope to, someday, make this project a reality. After deciding on a concept for my logo to represent, my next step was to start sketching…
Bringing the sketch to the screen…
I find sketching to be a great tool for brainstorming, and I thoroughly enjoy the process. To begin, I started creating rough sketches of what I considered to be universal symbols of my logos’ themes. I wrote down a few “base” words and terms that I felt accurately portrayed or described my topic. Since the objective of “A Cause to Create” is to utilize art as a tool to help people, I wrote down words like; community, charity and art. Next, I listed the objects that I felt most clearly portrayed and visually symbolized those concepts. The visual symbols I came up with included things like; open-palm hands, heart shapes, colors, people in groups and art-tools like paint brush and palettes. I also did a Google search of existing logo designs and stock images like charity, artists, community and helping, in order to cross reference the image ideas and symbolism that I came up with whilst brainstorming. During my Google image search, I noticed a few repeating similarities in the design elements of related logos. When it came to logos that represented Charities and Non-profits, they seemed to primarily utilize simple shapes and smooth, clean lines. Additionally, when it came to the font that was incorporated, a Sans-Serif style like Helvetica was almost always selected. Taking into consideration that design is never random, I suspect that those particular traits and characteristics were chosen to portray a welcoming sense of approachability. The clean lines of both the design and font are un-intimidating and less complex. Traits that would be ideal for a non-profit organization or charity logo. I made sure to try and incorporate similar characteristics in my design.
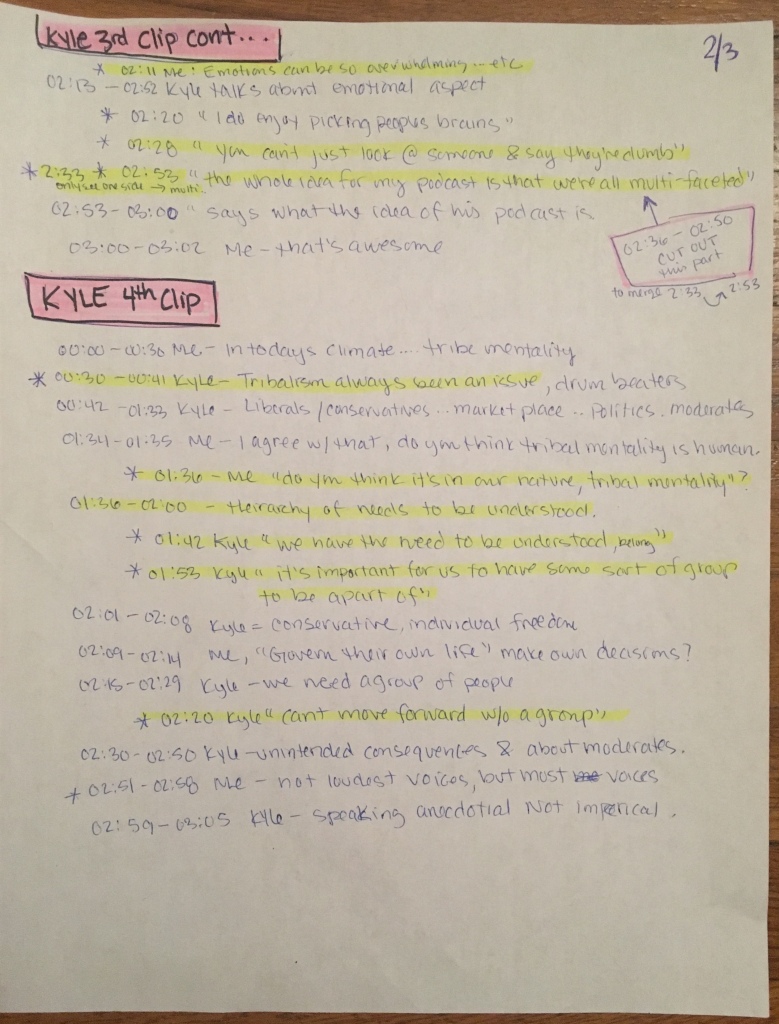
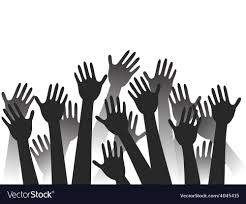
After using a Sharpie and some highlighters to sketch out some rough ideas, I decided on a basic design concept. A classic paint brush with the bristles portrayed as long, multicolored hands. I chose the paint brush to symbolize art and the various colored hands to symbolize the idea of community, diversity and helping.
*Credit: Images acquired by Google image search for “Clip Art of Hands“. (Watermark intentionally left visible for copyright purposes)
To begin my logo, I started by creating the “metal” part of the paint brush. To do this, I selected the rectangle tool, drew a long horizontal shape, set the fill to a medium grey and the stroke to a 0.75 with a slightly darker grey. Next, to make the handle, I chose the ellipse tool and drew a tall narrow oval to intersect perpendicularly with the bottom center of the grey rectangle, and set the color to a medium tan with zero stroke. To create the triangle, that would serve as the wider wood part of the handle, I used the polygon tool, drew the shape, and deleted two of the five anchors by selecting them with the direct select arrow and hitting delete. I moved the triangle into the left corner of the ellipse/rectangle intersection, and applied the add anchors tool to position several additional anchors along the diagonal edge of the triangle. To transform the diagonal edge of the triangle into a smooth concave curve, I direct selected each anchor and shifted it into the desired shape. To achieve an exact symmetrical duplicate of the triangle shape on the other side of the ellipse, I selected the triangle and applied object-arrange-reflect. I then selected the ellipse and two triangles and grouped them together to make it easier to move them around on the page. To make the metal part of the paint brush look more realistic, I used the rounded rectangle tool, changed the corner radius to “3pxls” and drew two small rectangles to place inside the larger original shape. To create a more metallic look, I gave them each a radial gradient and selected a medium grey for the center and a dark grey for the outside, then lowered the opacity for a smoother blend. For the text, I wanted something interesting, but also simple and un-intimidating, so I decided on “PTSans.” I changed the font to Bold, and placed it along the “metal” part of the paint brush where the actual brush brand name would typically be located. To create the many colorful hands, I used a few variations of the shape tool. For the arms I used the rounded rectangle tool, and for the hands I used six ellipse shapes; A large round ellipse for the palm, and five small narrow ellipses for the fingers. I then added additional anchors to the fingers to adjust and customize each of their shapes. This allowed me to easily transform the small narrow ellipses into five fingers, as well as create a more realistic palm for the hand shape. After creating one hand that I felt satisfied with, I used the copy-paste commands to clone them. I also added even more anchors to the cloned hands so that I could make subtle adjustments to differentiate the hands from one another so they would appear slightly different. After positioning the arms and hands by selecting a variation of “moveforward” and “move backwards” commands, I changed each to a bright color and followed a rainbow color palette from left to right. I selected each individual arm and applied a linear-gradient using the original hand color and a slightly darker version of the hand color for the gradient spectrum. I then adjusted the angle position of the gradient to -105 so the bottom of the arm coming out of the paint brush would be the darker shade. The gradient effect is subtle, but it creates a lovely extra dimension to the overall design.
Now For Some Feedback….
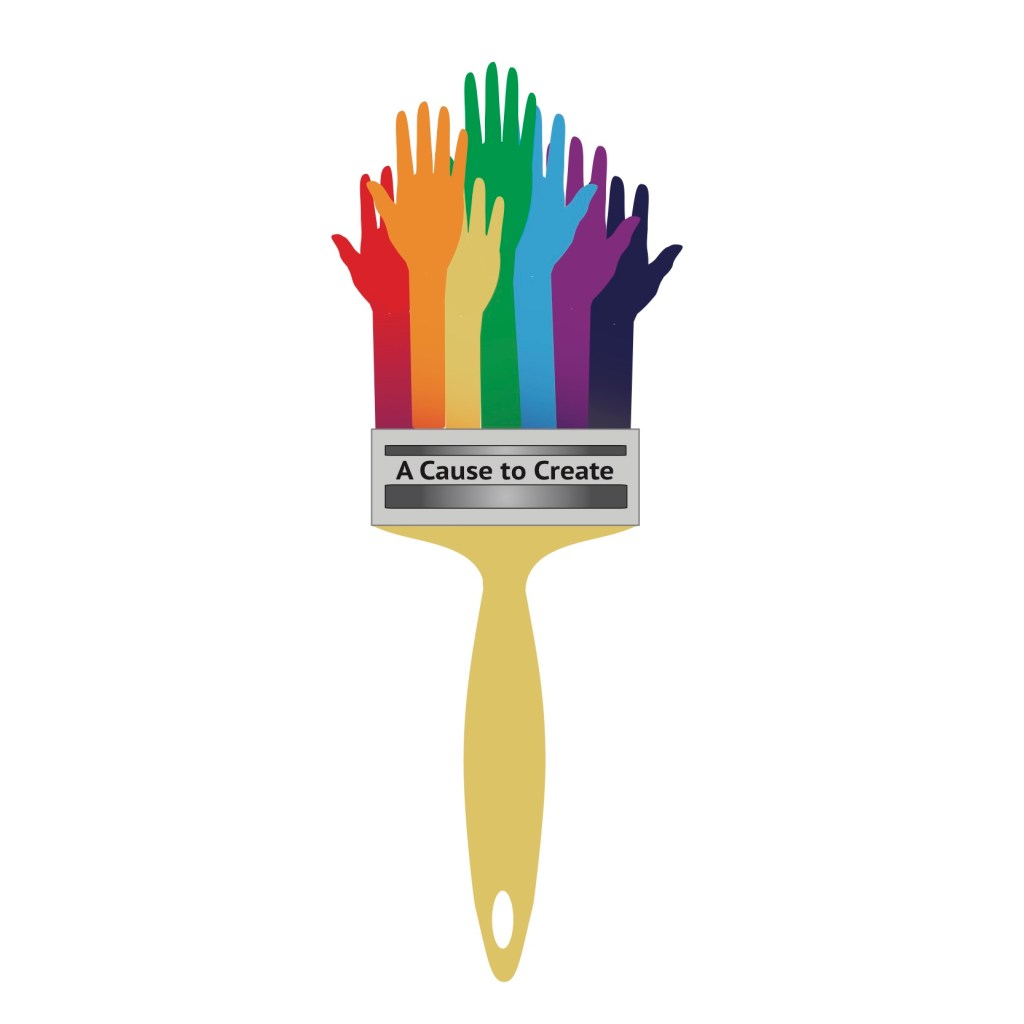
Throughout the development and creation of my logo draft, I had a few moments where I second guessed certain aspects of my design and wanted a second opinion. I was eager to see the thoughts and feedback from my group, and was looking forward to the helpful insight, I knew, they would provide. One crucial element of my logo that was mentioned was the font that was used for “A Cause toCreate.” It was suggested that it may be too simple of a font, and that I should try experimenting with different lettering. This was a great suggestion from my group, and it resulted in the selection of a much more cohesive font; “Noteworthy BOLD” with an applied 0.25pt stroke. The new font was the perfect combination of an artistic & minimalistic lettering styles. I also received feedback regarding the length of the various hands. It was suggested that they may work better if they are slightly closer together in length, instead of the green hand sticking out so prominently. This was easily fixed, and I completely agree that the logo works better with the hands at slightly closer lengths.
In addition to the helpful feedback and insight from my group, I was also able to evaluate and pin-point a few aspects of my logo that I felt could be improve on. One aspect that I felt was lacking in my logo was stronger visual dimension, particularly with the paint brush handle. To fix this, I Googled several images of basic paint brushes and referenced them throughout the revision of the brush handle. I selected subtle characteristics from each image that I felt could be applied successfully to my design, and incorporated them into my final logo.
*Credit: Google Image Search – “Paint Brushes”
In order to obtain a similar 3D effect that you can see in the reference photos, I decided that my paint brush handle needed to appear to be beveled along the edges. However, prior to creating the pseudo-bevel, I would have to merge the three shapes that made up the handle into one single shape. Without this step, I wouldn’t be able to apply a gradient to the handle as a “whole”, the gradient would, instead, apply itself to the three separate shapes that make up the handle, and trust me, it looks really strange. To merge the three shapes, I made sure they were all selected, clicked the shape builder tool, then dragged the selection-line through all three to unify them together. Once I had the handle transformed into a single shape, I started on the bevel. To create this effect, I made an exact clone of the wooden handle by utilizing the copy-paste command. Next, I scaleddown the “clone” by selecting the object and dragging the corner anchor inwards. I then placed the smaller handle on top of the original handle and made small adjustments with the anchors until it sat flush with the top metal part, but the sides still remained clearly visible as the bevel. To create the illusion of dimension, I applied a radial gradient to the bottom handle. I selected slightly lighter and darker shades of the original color to use as the gradient spectrum, and then positioned the gradient-slider to 70% to give the new bevel realistic highlights and depth. Additionally, I created a small bevel to give dimension to the hole of the handle. Using the ellipse shape tool, I drew a small oval, applied a linear gradient using the same colors for the gradient spectrum, and positioned the angle of the gradient so the darkest area would appear at the bottom. I finished it off by creating and placing a flat white ellipse on top to complete the hole.
My favorite improvement to the final logo, is most certainly, the adjustments made to the metal part of the paint brush. I removed the radial gradient because the effect of a circular gradient on a rectangular object just didn’t make sense. Instead, I experimented with a gradient preset that I stumbled across called “Green, Yellow, Orange.” It consisted of a linear gradient with seven different “gradient sliders” that repeated the colors; green, yellow and orange in a pattern. I decided to keep the number of sliders, but replaced the colors with a variety of light grays, medium grays and dark grays. This allowed me to create bright shiny highlights that mimicked the reflective surface of metal, and brought the perfect layer of dimension to my logo. For the final touch, I added three small metal rivets to the brush. It’s a minor detail that I noticed in actual photographs of paint brushes, and I had been hoping to incorporate it somehow into the logo. To create them I drew a simple circle-ellipse by holding down shift, and finished them off with the tiniest radial gradient to make them pop.
Developing this logo and re-learning Illustrator has been a challenging experience. I felt that I really pushed myself, technically and aesthetically, with Adobe Illustrator, and came away from the whole process feeling proud and happy with my final logo creation. It’s truly been one of the highlights of this semester, so far.
I began this week’s draft logo project by thinking about what, exactly, I wanted my logo to represent. I decided on creating a logo to showcase my overall topic; “A Cause to Create”. It’s an idea that I feel very passionate about and I hope to, one day, make this project a reality. My first step was to brainstorm imagery and to try and break down the symbolism of what I wanted my logo to express. I started by writing down some general words that I felt accurately portrayed or described my topic. Since the objective of “A Cause to Create” is to utilize art as a tool to help people, I wrote down themes like; “community”, “charity” and “art”. Next, I listed the objects that I felt most clearly portrayed and symbolized those concepts. The visual symbols I came up with included things like, open-palmed hands, heart shapes, colors, people in groups, and art tools like paint brushes and palettes. I also did a google search of existing logo designs and stock images like “charity”, “artists”, “community” and “helping”, in order to cross reference the image ideas and symbolism that I came up with. While gathering reference points and searching for images that related to my theme, I noticed a few consistent similarities in the design elements of the logos. When it came to logos that represented charities and non-profits, they seemed to primarily utilize simple shapes and smooth, clean lines. Additionally, when it came to the font that was used, a sans-serif style, like Helvetica, was almost always chosen. Considering that design is never random, I suspect that those particular traits and characteristics were chosen to portray a welcoming sense of approachability. The clean lines of both the design and font are un-intimidating and less complex. Traits that would be ideal for a non-profit organization or charity logo. I made sure to try and incorporate similar characteristics in my logo design. After sketching out a few rough ideas with a sharpie and some highlighters, I decided on a basic design concept. A classic paint brush with the bristles being portrayed as long multicolored hands. I chose the paint brush to symbolize art and the various colored hands to symbolize the idea of community, diversity and helping. To begin my design in Illustrator, I chose the rectangle tool and created a long horizontal shape. I set the fill to a medium grey color, and set the stroke at 0.75 with a dark grey color. Next I chose the ellipse tool and drew a tall narrow oval to intersect perpendicularly with the bottom middle of the rectangle and set the color to a medium tan with a zero stroke. To create a triangle, I used the polygon tool, and deleted two of the anchors by selecting them with the direct select arrow and hitting delete. I moved the triangle into the left corner of the ellipse/rectangle and used the “add anchors” tool to place several additional anchors along the diagonal edge of the triangle. To transform the diagonal edge of the triangle into a smooth concave curve, I direct selected each anchor and shifted it into the desired shape. To achieve an exact symmetrical duplicate of the triangle on the other side of the ellipse, I selected the triangle and applied object-arrange-reflect. I then selected the ellipse and two triangles and grouped them together to make it easier to move them on the page. To make the “metal” part of the paint brush look more realistic, I used the rounded rectangle tool, changed the corner radius to “3” and drew two small rectangles to place inside of the original one. To create a metallic look, I gave them each a “radial” gradient and selected a medium grey for the center and a dark grey for the outside, then lowered the opacity for a smoother blend. For the text, I wanted something interesting, but also simple and un-intimidating, so I chose “PT Sans.” I changed the font to Bold, and placed it along the “metal” part of the paint brush where the actual brush brand name would normally go. To create the many colorful hands, I used a series of the shape tools. For the arms I used the rounded rectangle tool, and for the hands I used six ellipse shapes. One large round one for the palm, and five small narrow ones for the fingers. I used the direct select tool and added additional anchors to adjust and customize the fingers. After I created one hand, I used the “copy/paste” commands to clone them, and additional anchors and direct selection adjustments to make each look slightly different. After positioning the arms and hands where I wanted them, I changed each to a bright color and followed a rainbow color palette from left to right. I selected each “arm” and applied a “linear” gradient to it using the primary hand color and a slightly darker version of the hand color for the spectrum. I then adjusted the angle position of the gradient to -105 so the bottom of the arms coming out of the paint brush would be darkest. The effect is subtle, but creates a nice extra dimension to the overall design.